7:45 AM About a month ago, I discovered this sketch and this pile of fabrics on my cutting table.
 I decided that it would make the perfect Christmas gift. I think she intended the dress body to be a zebra print. The ruffle and the neckline are to be a patchwork of the other prints-I think. And she’s designed a headband. Really. I have a larger piece of the zebra print in my stash, so we are in luck.
 Princess Seams: Long, shaped seams in the front and/or back of a garment. These seams help take a flat piece of fabric and shape it to fit the body. A princess seam dress usually has 2 long seams in front and 2 in back. It is constructed with a center front piece, 2 front side pieces, center back piece(s), and 2 back side pieces.
Now I’m off to find a pattern. She usually draws dresses with princess seams. I’ll let you know what I find.
8:15 AM Decision time (the first of many today)! I have two patterns that would work:

I think I'll use be using Simplicity 2470. I know I'll need a 10, but I need to double check to see if I need to add some length. I choose this pattern for it's princess seams.

I'll be making one of the sleeveless versions, but that ruffle...

I'll need to modify the ruffle. I love the flounce that a circle ruffle gives, but this means I'll have to cut lots of little trapezoids to piece together. I'll have to think on that a little more. And...I'll need to decide if I like the 2 ruffles or just one.
I also wanted to take a moment and introduce you to my assistant today.

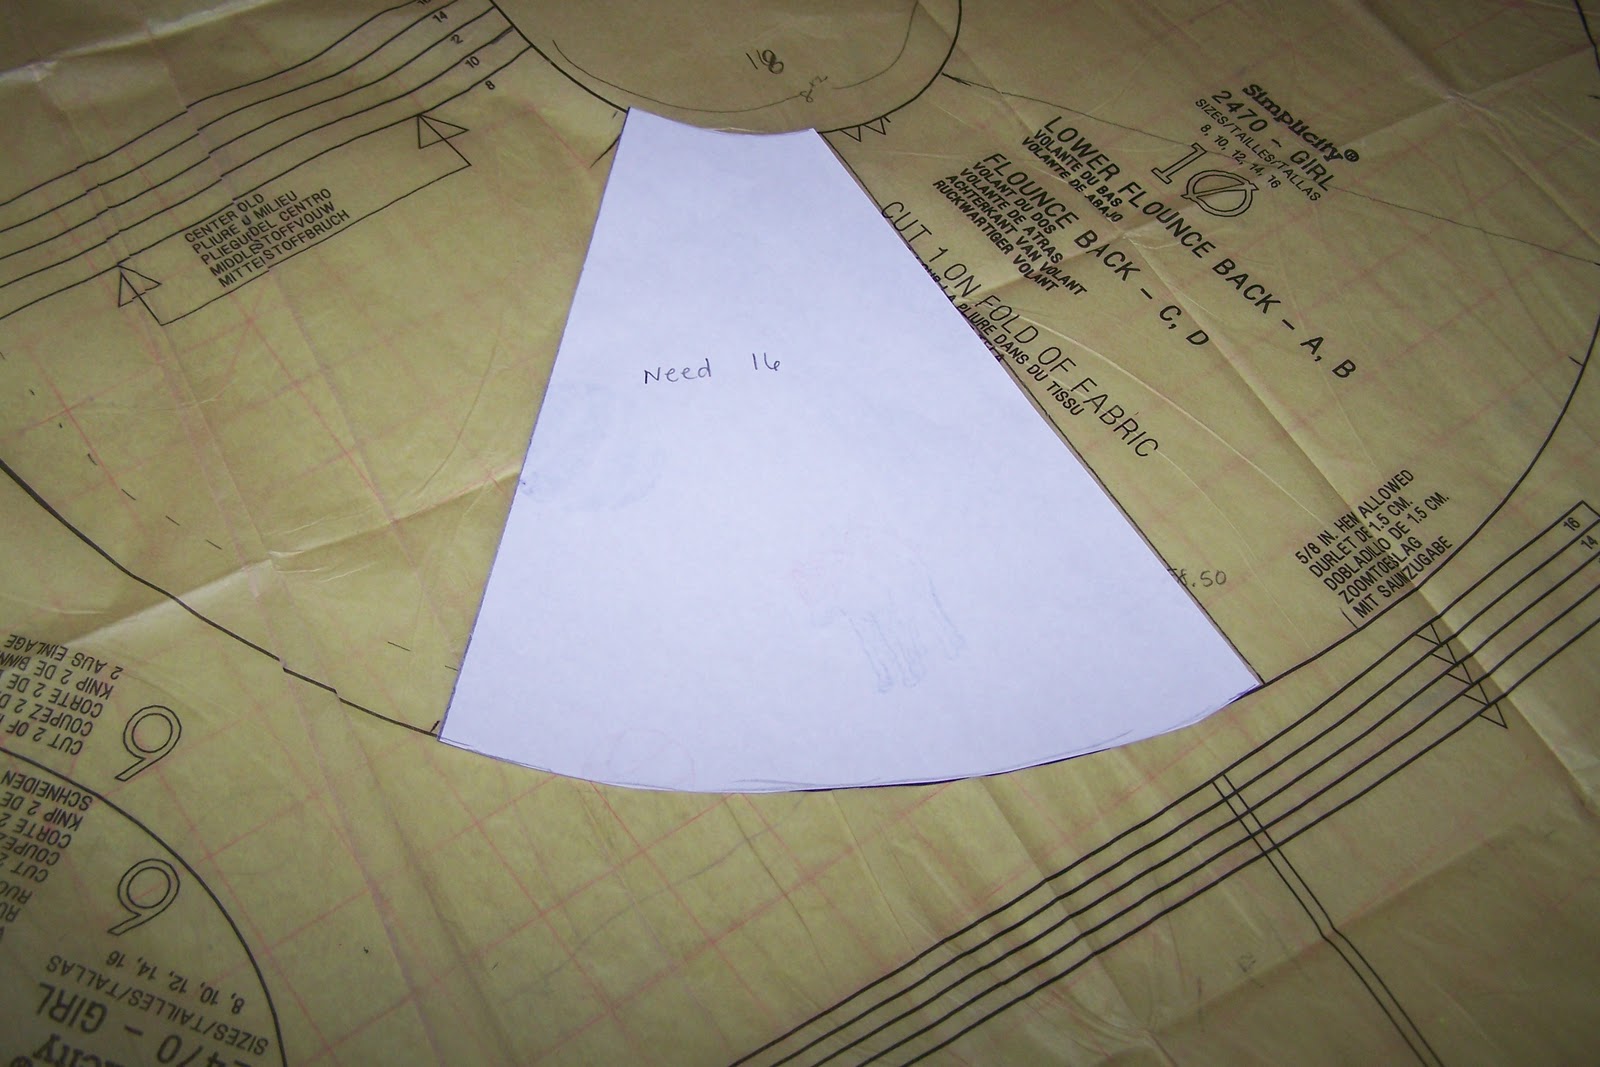
9:00 AM I think I've figured out the ruffle. This is the ruffle back. The front looks the same.

I drew in my seam line so I wouldn't included the seam allowance in my math in a minute. (The other side is on the fold.)

I measured the top curve.

I measured the bottom curve.

I divided each of these in 4ths and drew in my segments.

I made a template of my ruffle segment, but this doesn't include seam allowances.
Seam allowance: Basically a margin, or the distance between the seam and the edge of the fabric. Quilters use 1/4 inch usually. Garments often use up to 5/8 inch. Anytime you piece something, you have to remember to add the seam allowance, or when you piece the fabic, it will not come to the original size.
I made a new template with 5/8 inch seam allowances added to either side. This time I used a sturdy template.

Now we cut...

9:45 AM I decided to make the ruffle first. Just to be sure. I laid out my ruffle pieces in the order I liked (random, actually).

I pieced the ruffle with 5/8 inch seam allowances. I don't love big seam allowances, but I kept with those elsewhere in the pattern.

Here's what the front looks like pieced and pressed.

It's close to the patten shape. Hooray!

Close enough for me anyway.

Now for Decision Time #2:
One flounce...

or two?

11:00 AM I've got the dress cut. I added 1 1/2 inch to the length by cutting the pattern along a lengthen/shorten line and spreading the pattern pieces 1 1/2 inches. If you do this, remember to keep your grainlines lined up!
Lengthen/Shorten line: This line is usually indicated on the pattern. This is the place that the designer wants you to add or take away length. If you just add length to the bottom of the garment, you could mess up the original design lines.

I've also cut out the facing. From her drawing, I can't tell if my daughter wanted a ruffle along the neckline or what. I've decided that I will do a pieced facing and turn it to the outside of the dress, rather than inside.
I treated the facing much like the ruffle. I started by drawing in my seam lines and determining the true shape of my facing.
Facing: A lining applied to a neckline, waistline, or sleeve to add strength and structure. Typically, these are inside the fabric, but the facing can be made in a contrasting fabric and turned to the outside for design purposes. The term comes from tailoring, and refers to the part of the coat lapel that turns (faces) outside.


Then, I measured the facing and divided it into segments. I didn't want extra bulk under the facing, so I decided to piece the segments with 1/4 inch seam allowances.


I stitched my pieces together with 1/4 inch seam allowances.


Serging: Overcasting the raw edges of fabric with a V-shaped stitch. I use a serger, which is the machine that makes the stitches. Sergers can also stitch seams and some can create rolled hems.

12:15 PM Time to put the dress together! Princess seam dresses have a few basics steps:
- Stay Stitch
- Put the front together.
- Put the back together.
- Put the zipper in.
- Put the sides and shoulders together.
- Add the facing.
- Add sleeves (optional).
- Hem.
Stay Stitching: Temporary stitches just outside the seam line that stabilize the fabric to prevent stretching, usually at the neckline or waistline. Stitch from the outside edge toward the middle. These stitches will not be seen in the finished garment.
Step 1: Stay Stitch

Step 2: Put the front together. Here is a side front and the center front piece. They have a similar curve.

But when you put right sides together, those curves don't look similar anymore.


After Steps 3 and 4: I finished all my raw edges with my serger.

As for my help:

4:46 PM I finished a few more steps on the dress before I had to pick up the kids, but I didn't have time to tell you about it.
Step 4: Install the zipper. I chose to use an invisible zipper instead of the lapped zipper that the pattern indicated. I forgot to take pictures of several of the steps, but don't worry. There are great instructions included inside the packages of most invisible zippers.
To get started, press the zipper, pressing the coils away from the tape.

Finish the center seam edges.

Place the zipper on the fabric, right sides together, with the coils facing away from center back. Stitch down as far as you can.

After these steps, I forgot to take pictures. You'll need to follow the instructions in the zipper package to stitch the other side of the zipper in place and then stitch the remaining center back seam. When you are finished, it looks something like this::

Step5: I stitched the dress together along the sides and the shoulders. Again, I finished all my raw edges with my serger.

Step 6: The facing. Normally you would pin the facing to the dress with right sides together before sewing. Then, after it is sewn, you would flip the facing to the inside. I want my facing to flip towards the outside, so I pinned my facing like this: RS facing to WS dress.


Step 7: Put in the sleeves. I'm not using sleeves, so during this step, I need to finish the armhole edges. I chose to do this step later.
Step 8: Hem. I'm adding a ruffle before I hem. I've opted for 1 ruffle--I think. To make finish the ruffle, I stitched the edges together to make a complete circle.

I pinned the ruffle to the bottom edge of the dress, matching the right sides. I stitched these on with a 5/8 inch seam.

It's starting to look like her sketch!

I still need to finish the armholes, finish the raw edges of the pieces of the ruffle and hem the dress. I'm thinking about a second ruffle, but I think 1 is closer to her sketch.
Finishing up with the details after a Christmas Reveal:
I must back up and tell you how I did step 6 (sleeves or armholes). I used double fold bias tape. I pressed open the center fold, and I pressed open one side fold.
One neat thing about bias tapes: You can shape it as your press. I pressed a curve into mine as, it will be curving around the arm hole. 
Pin the bias tape to the armhole. (I added more shadows to the photo can you see the details.) Place the tape one the right side of the dress with the folded edge up, away from the right side of the dress. The raw edges of the bias tape will be near the raw edges of the armhole. Match the center crease to the seam line (5/8 inch from the edges in my case).
Stitch along the seam line.

Fold along the seam line, folding the bais tape to the inside. You now have a pretty finished edge. 
Stitch near the edge of the bias tape.

I chose to hem the dress with a rolled hem on my serger. I could have also made a narrow hem and stitched on the sewing machine.
Here are a few shots of the finished project:


2 comments:
I love your assistant!
I love the dress!!!
My mom used to combine patterns for me, too. I have kept as many items she made me that I could. They will always be special to me.
Post a Comment