Wednesday, May 12, 2010

Fun Beginner Patterns

Looking for a project perfect for a beginner?  Try one of these:

simplicity skirt 

Two great things about this pattern: 

The instructions are written for a brand some one brand new to sewing.

The pattern teaches you how to embellish your skirt—something most “learner” patterns leave off!

mccalls purse


This purse would be perfect for the summer.  This pattern is designed to teach you how to sew.

If you looking for easy home dec projects to get you started, try these Sewing For Dummies patterns.


Happy Sewing!


Monday, May 10, 2010

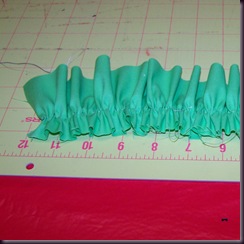
The Easy Way to Gather Fabric

This is not the way I’d teach you to gather fabric if you took my sewing class.  This is not the way most authors would tell you how to gather fabric.  But…if I have a long ruffle to gather, you can just about bet, this is how I will gather the fabric.

I’m showing you how I gather fabric with my computerized machine.

1.  Place fabric under needle and lower presser foot.  Take one stitch and then backstitch. 100_7064
2.  Set your stitch length to the longest setting possible.  Tighten your top thread tension as much as possible.  If you have a manual machine, just turn your stitch length dial to the longest setting.  You may also have to Increase you tension on your upper thread tension dial. 100_7066
3.  Stitch and watch your fabric gather on its own.  At the end of your fabric, do not backstitch.  100_7070
4..  Remove your fabric from your machine and adjust your gathers according to the length you need.  To tighten the gathers even more, gently pull the top thread.  100_7071

I find that using this method on my machine gathers my fabric to about 1/3 its original length.  It is easy to tug it as tight as 1/6 the original length.

Easy, isn’t it?  The most important step is still to come: 

Do not forget to reset your thread tension to its usual setting.

Happy gathering!

Friday, May 7, 2010

Upcoming Sewing Classes in the Shreveport Area

For Kids

June 1-3
Tuesday, Wednesday and Thursday Mornings
Beginning Sewing For Girls (1st thru 4th grade) Email for Details
June 7-28
Monday Mornings
Sleepover Sewing (Beginning Sewing for 10 and Up) LSU-S
June 24-25
Thursday, Friday Mornings
The Next Step Sewing (1st thru 4th grade) Email for Details
July 1
Thursday Morning
Sewing your Bedroom Basics (Pillows, Curtains, etc.) LSU-S
July 19-23
Monday-Friday Afternoons
Wardrobe Re-Fashion for Tweens LSU-S

For Adults

June 8-29
Tuesday Mornings
Needles, Nuts and Bolts (Beginning Sewing) LSU-S
June 8-29
Tuesday Evenings
Shirt Making LSU-S
June 26
Saturday
Purses LSU-S
July 6-27
Tuesday Mornings
Sew More (Beginning Sewing II) LSU-S
July 6-27
Tuesday Evenings
Needles, Nuts and Bolts (Beginning Sewing) LSU-S
July 9-10
Friday and Saturday All Day
Sewing Workshop:  Christmas in July LSU-S
July 26
Monday Afternoon
Sergers LSU-S
August 2
Monday Morning
Knits LSU-S
August 5-26
Thursday Evenings
Refashion and Alterations LSU-S
August 7-14
Saturday Mornings
Sew More (Beginning Sewing II) LSU-S

Wednesday, May 5, 2010

A Handy Resource

Ever wondered what exactly “four-way stretch” means on the back of that pattern envelope.  What about “chintz”, “faille”, or “tricot knit”?  Check out FabricLink’s Textile Dictionary.

Sunday, February 28, 2010

Sewing Classes in the Shreveport Area

For folks in the Shreveport/Bossier Area, here’s a brief list of my upcoming sewing classes:


March 9  6-8 pm Appliqué Class email for details
March 15-18  1-4 pm Kids Spring Break Sewing Class email for details
March 23  6-8 pm Appliqué Class email for details
April 6, 13, 20, 27 Sew More (The Next Step for Beginners) LSUS
April 8  6-8 pm Funky Fabrics email for details
April 22  6-8 pm Appliqué Class email for details


Descriptions: 

Appliqué Class:  Learn techniques for creating appliqués perfect for embellishing your garments.

Kids Spring Break Sewing Class:  For 1st – 4th graders, learn to make a pillowcase and an elastic waist skirt.

Sew More:  Please visit the LSUS Continuing Ed Catalog for more information.

Funky Fabrics:  Learn techniques for sewing with minky, polar fleece, vinyl and other fun fabrics.

Wednesday, December 30, 2009

A Scarf for Your Diva

 100_7088

Isn’t this scarf the cutest?  And super easy to make as well.  Want to make your own?

You’ll need:

  •    1/4 yard  flannel
  •    1/4 yd cute cotton
  •    1/2 yd pompom trim
  •    lots of scrap trims and ribbons (in 6+ inch lengths)
  •    a rotary cutter and mat
  •    pins
  •    thread (either matching or clear)
  •    your sewing machine and a blind hem foot if you have it
1.  Trim a full length (usually about 44-45 inches long) of flannel to 6 inches wide.
100_7040
2.  Trim a full length of cotton to 6 inches of wide.
100_7038
3.  Match flannel and cotton pieces.  Trim length of one if necessary.
100_7042
4.  Stitch trims widthwise across the flannel piece in a random placement.  Vary distances between trims, mix and match colors, just have fun.  Just avoid the 1/2 to 1 inches of either end. 100_7045
I attached the the wider trims using my blind hem foot.  I scooted my needle as far to the left as possible and then lined the edge of my trim up with the guide on the blind hem foot.  If you don’t have a blind hem foot, just stitch as close to either edge of your trim as possible. 100_7050
For the skinner trims, I zig zagged with my clear thread over the trim.  
5.  Press 1/2 inch hem on both short ends of both flannel and cotton pieces.
100_7052
6.  Place flannel to cotton, right sides together.  Pin in place.
100_7053
7.  Stitch along long edges of scarf with 1/2 inch seam allowance.
100_7055
8.  Turn the scarf right side out.  Press carefully.
 
9. Cut pom-pom trim to length so that you can slip it into the open short ends.   I decided to use 2 different colors and layered them.   Pin in place.
  100_7056 100_7057  
10. Top stitch along the short edges, securing hem and pom-poms in place.
 100_7058
11.  Wrap around the neck of your favorite diva and let her enjoy!
100_7059

100_7085 Finished size:  approximately 44 inches by 5 inches

Thursday, December 10, 2009

Coffee Cozies!

Here’s a quick and easy Christmas sewing idea:  Coffee Cozies to protect your fingers from that hot cup of latte you just grabbed at your favorite coffee shop. 

 000_0027

To make them:

  1. Buy a drink from your favorite coffee shop. 
  2. Enjoy your coffee.
  3. Before you throw the cup in the trash, snatch that handy little cardboard cup-sleeve and tear it apart at the seam.
  4. Trace it for your pattern.  I chose to add about 1 inch to the height of mine.
  5. Cut out your pattern twice:  once in fleece and and once in a really cute cotton.
  6. Cut a 3 x 3 square in a cute coordinating fabric.  (Raid your scraps!)
  7. Place your cotton and your fleece right sides together and stitch all the way around, leaving about 2 inches unstitched for turning.
  8. Trim your corners and turn it right side out.
  9. Press, folding in the hem on the unstitched  section.
  10. Top stitch around the finished edges, securing the opening.
  11. Now for your 3 x 3 square:  Fold under 1/4 inch on 3 sides and 1/2 inch on one side.
  12. Top stitch the 1/2 inch hem in place.
  13. Center your square on your new cup sleeve and top stitch on remaining 3 sides.
  14. Add a button for cuteness.
  15. Stitch your two short edges together to shape this flat piece into a sleeve.
  16. Slip it on your favorite travel mug and enjoy another cup of coffee!